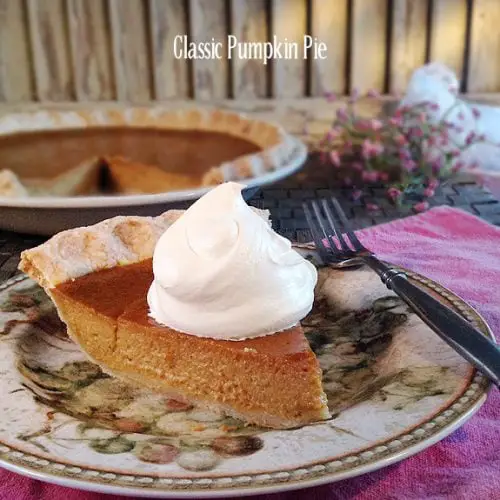
Nothing says fall like flaky crust filled with a spicy, creamy filling. The Classic Pumpkin Pie is this season iconic dessert. And this one takes the cake.
I gotta tell you, I’m a fan of pumpkin. Throw some sugar and spices on the squash, toss it in the oven and I’m good to go.
That’s why, even though I pulled together a list of great pumpkin desserts last week, a list that included not one, but two pumpkin pies, I’m back with another. After all, we can never have too much pumpkin pie, right?
This version comes from the kitchens of Fine Cooking Magazine, which would have been a good enough reason to bake it in and of itself. The use of whipping cream over canned milk brings it very close to my mom’s version, which makes it doubly awesome.
I may as well tell you up front that if there’s a pumpkin pie in a magazine I’m going through this fall, I’ll probably make it. It’s my job to search out the absolute best recipe for you, after all.
Plus, how else can I have a slice (or two) for breakfast like I did this morning.
Table of Contents
The Process
You know all those pie crust recipes you see that proclaim the apocalyptic disaster that’ll take place if you handle the dough too much? This isn’t one of them. In fact, be ready to get your knead on.
Okay, so it’s not really kneading; it’s called fraisage, or smearing, a technique of streaking the butter across a flat surface with the palm of your hand in order to create streaks of butter which later become a flaky crust. You can see how Abby Dodge, the author of this recipe, smears her dough here.
Other than that step, the crust comes together the way any other crust would. I do have to say that I found it very easy to make and to work with. It’s a fantastic technique.
The reason that my mom uses heavy cream instead of the evaporated milk is that she thinks the milk leaves an aftertaste in the final pie. I’m not sure if Fine Cooking felt the same way, but the half-and-half works.
It’s very easy to make the filling; just a matter of whisking things together in the proper order, and the baking time was spot on.
The Verdict
Hello, gorgeous. I didn’t want to share. I would have loved to grab this pie and hide in a closet until I had eaten it all. If Hubby didn’t like pumpkin pie too, I could probably get away with that. Unfortunately, he does, so we enjoyed slices of this together for dessert and, yes, breakfast.
Sophie, well, she’s still a goob. At least she was willing to try a bite and even swallowed it this time, but no, she wasn’t a fan. I take that back. She loved the crust.
What I’d Do Different Next Time
Not a thing.
The Recipe

Classic Pumpkin Pie
Ingredients
Ingredients for the Dough
- ½ cup (4 oz.) unsalted butter
- 5-5/8 oz. (1-1/4 cups) unbleached all-purpose flour; more for rolling
- 2 tsp. granulated sugar
- ½ tsp. table salt
Ingredients for the Filling
- 1 15-oz. can pure pumpkin purée (1-3/4 cups)
- ½ cup packed light brown sugar
- 1-1/4 tsp. ground cinnamon
- ¾ tsp. ground ginger
- ¼ tsp. freshly ground nutmeg
- Pinch table salt
- 1-1/3 cups half-and-half
- 1 tsp. pure vanilla extract
- 2 large eggs, at room temperature
- Whipped cream, for serving
Instructions
Instructions for the Dough
- Cut the butter into 6 pieces and put in the freezer. Measure out 3 Tbs. cold water.
- Whisk together the flour, sugar, and salt in a large bowl. Using a pastry blender or two butter knives, cut the cold butter into the flour mixture until the pieces are just larger than peas. (You can also do this in a food processor using short pulses. Scrape the mixture into a large bowl before proceeding.)
- Drizzle the cold water over the mixture and, using the fingertips of one hand, pinch and squeeze the mixture while tossing with a silicone spatula in the other hand until it begins to form shaggy clumps.
- Scrape the dough onto a clean work surface. Using the heel of your hand, gently smear the dough away from you in sections. Using a bench scraper, gather and fold the crumbs on top of each other and turn the pile 180°. Repeat the smearing action, gathering and turning the dough several times until the crumbs just hold together. Shape the dough into a 5-inch disk, smoothing the edges. Wrap in plastic and refrigerate until firm, at least 2 hours.
- Let the dough sit at room temperature until it’s pliable enough to roll, 10 to 20 minutes.
- Put a large piece of parchment paper on a work surface, lightly flour it, and put the dough in the center. Lightly flour the dough and cover with another piece of parchment. Using a rolling pin, roll the dough from the center to the edges into a 13-1/2-inch circle that’s about ⅛ inch thick. After every few passes, rotate the parchment a quarter turn, and lift the dough and stretch out the parchment underneath; it tends to bunch a little. Reflour the parchment lightly only as needed; excess flour can make the crust tough.
- Peel away the top piece of parchment. Gently roll the dough around the rolling pin, position the pin over a 9-inch glass pie plate, and unroll, easing the dough into the plate. Gently press the dough into the sides and bottom of the plate without stretching it, allowing the excess dough to hang over the edges. Trim the excess dough to a ¾-inch overhang. Roll the overhang under itself to shape a high edge crust that rests on the rim of the pie plate. Crimp the dough into a fluted edge. Cover and refrigerate the crust while the oven heats.
- Position a rack in the center of the oven and heat the oven to 375°F. Line the crust with foil or parchment, and then fill with pie weights or dried beans. Bake for 25 minutes. Carefully remove the foil and pie weights. Bake until the crust is pale golden and looks dry, 5 to 8 minutes more. Let cool on a rack while you make the filling. Reduce the oven temperature to 325°F.
Instructions to Make the Filling
- Whisk together the pumpkin, sugar, cinnamon, ginger, nutmeg, and salt. Whisk in the half-and-half and vanilla. Add the eggs and whisk until just blended. Pour the filling into the baked crust (it’s OK if the crust is still warm).
- Bake until the center of the filling jiggles like jello when the plate is nudged, 48 to 50 minutes. A few small cracks might appear close to the crust—that’s fine. Cool the pie on a rack until room temperature, about 3 hours. Cover loosely and refrigerate until ready to serve. The pie is best when served within 2 days of baking, and can be warmed slightly in a 300°F oven, if desired. Serve with whipped cream.
For more delicious desserts and dishes, check these out:

